
Monday, February 28, 2011
Tuesday, February 22, 2011
Navel is That My Belly Button?
The first type of orange I wanted to talk about is probably the most common, a navel orange. Navel oranges have a growth of a second fruit at the apex, which protrudes and resembles a belly button or navel. I actually did not know that it was called a navel orange for this reason. Did you?

Navel oranges are primarily used for eating rather than juicing. First people like to eat them because they have less juice and thick skins. The thick skins makes it easier to peel. Also the rendering process of making juice causes it to be bitter so it is really not used for juice. The growing season is very long for these types of oranges. It is available in the US from November to April but they are at their peak January to March. That is why you see them a lot in the stores right now.

Do you like navel oranges? How do you eat these?
Monday, February 21, 2011

Friday, February 18, 2011
Oranges, Oranges, and More Oranges
I have had an orange sitting on my desk since Monday and I keep telling myself I am going to eat it. The main reason that it has sat there is because oranges are not easy to eat and I am still not crazy about them. Believe it or not, I had never eaten an actual orange until about 3 years ago. They always intimidated me. Funny huh, an orange as a bully.

I love the smell and the taste but I have trouble with the pith and the work it takes to eat them. So I thought I would do some posts about varieties of oranges to get me more familiar with them and also ask for advice from you about how you eat them.
No one truly knows where the orange originated but there are now over 600 varieties of oranges. I had no idea that there were this many varieties until I started doing some research on oranges. The next couple of postings I am going to talk about some of the varieties of oranges. What is your favorite?
Thursday, February 17, 2011
Southwest Stuffed Peppers
You guys are going to laugh but I used to never be able to just look in the fridge and cabinet and grab stuff to make a recipe on the fly. What I mean is that I always used to started with a recipe and then pulled the ingredients but now I can do both.
Last night I had some ground turkey thawed and was talking on the phone and got to thinking I wanted stuffed peppers. So I went to the refrigerator and the cabinet and pulled out the following ingredients.
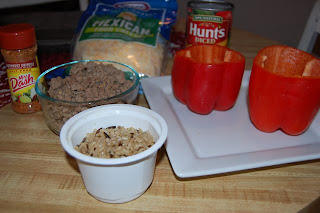
Browned ground turkey, brown and wild rice, peppers, fire roasted diced tomatoes, mexican cheese and Ms. Dash southwest chiplote seasoning. The rice was an instant microwaveable packet. I will say I am not a fan of these but used it because it was fast. You will need to cut the tops off of the peppers and get rid of the ribs and seeds.
Next just mix all the ingredients except the peppers together. I do not have measurements because I just eyeballed it.

Then you will stuff the mixture in the peppers. Then coat your baking dish with olive oil spray and place the peppers into the dish. Place in a preheated 375 degree oven and bake for 30-45 minutes depending on how soft you want the peppers. I like them easy to cut and cooked, so I did 45 minutes.

Serve with a salad and you will love them. You also could skip the meat and use more rice if you are vegetarian. Give them a try.

Wednesday, February 16, 2011
Shredded Chicken, What's Next
In a recent post I did Are You Chicken? I showed you how I cook shredded chicken. Ok now that you have this chicken, how can you use it. These are two of my favorites.


First is a Mexican Chicken Salad in a toasted taco shell. However if you are watching calories, skip the shell.

You will need any ingredients you like but I use the following:
huge amount of lettuce
corn kernels
roasted peppers
black beans
shredded chicken
Then I top with a lime dressing that I make out of olive oil, lime juice, salt and pepper. You can also use salsa or salsa and sour cream mixed. Use whatever you have on hand.

This salad is so light and filling.
Another great idea is Chicken Nachos. These are so good and also filling.

I use the following:
tortilla chips (love the On The Border ones)
shredded chicken
black beans
mexican cheese
sour cream

But once again you can add so many different toppings, salsa, jalapenos, or roasted red peppers.
I will post some more recipes later but wanted to share these now. How do you use shredded chicken?
Monday, February 14, 2011

Thursday, February 10, 2011
Are You Chicken?
I have never been good at cooking chicken. Maybe because I am sort of afraid of it when it is raw. I am definitely a snob when it comes to eating chicken because I only buy boneless chicken breasts. Even then I am horrible about fixing them because I overcook them. So recently I found a great way to cook chicken and there is NO THAWING involved.
 The hardest part of this recipe is getting out your ingredients. These include: frozen chicken, chicken broth, and seasoning. You can use any type of seasoning you would like. I love this Weber Roasted Garlic and Herb grill seasoning. It gives the chicken a great flavor. Use Ms Dash if you are watching your sodium intake. Also use low sodium chicken broth if needed. You will also notice that I use chicken bouillon cubes because I use a lot of chicken broth ad these are cheap.
 So you are going to put your FROZEN breasts in your slow cooker. I put six in at a time and then add the broth and seasonings. I use about 2 TBS but mostly just eye it.
 Then cover and cook for 4 to 6 hours on high and then 1 -2 more if needed on low. I usually take out two breasts early when I can stick a fork in them and they are almost ready to fall apart. These you can eat now or save to eat during the week.
 Then the others I will pull out and put in a glass dish and pull them apart with two forks to shred the meat. This meat I use for various recipes during the week and store in the refrigerator with a little bit of broth poured over the meat. The meat actually sits in the juice while you store it. This helps keep it moist. You can also refreeze for later but I think you will find you want to eat this chicken.
The next couple of days, I am going to share some recipes that I use this chicken in and having it already fixed makes these recipes very easy. So check back later.


The next couple of days, I am going to share some recipes that I use this chicken in and having it already fixed makes these recipes very easy. So check back later.
Wednesday, February 9, 2011
Perk Me Up
I live in Oklahoma and we have had more snow in the past 10 days than we have had in history. Plus brutal wind chills which makes going outside not fun. Before all this snow we had such a dry fall and early winter. All these elements have created havoc on my skin and made me very tired. So I thought I would share a homemade face and body scrub that will give your skin a perk up.
This coffee scrub will give dull skin a pick-me-up and the caffeine in the coffee beans will reduce puffiness.

Most everyone probably has the ingredients already in their house. You will need:
1 cup of ground coffee
1 cup of sugar
1/2 cup of olive oil
 You are going to take all of these ingredients and mix them together. After mixing together, you will want to store the scrub in an air tight container in a cool, dry place for up to two months.
 The scrub will have a grainy feel. While in the shower, massage the scrub over clean, damp skin, then rinse, and pat dry.
Remember if you use it on your face, be EXTRA gentle.
One bonus about this scrub is that it smells great and might even perk you up. Give it a try.
This coffee scrub will give dull skin a pick-me-up and the caffeine in the coffee beans will reduce puffiness.

Most everyone probably has the ingredients already in their house. You will need:
1 cup of ground coffee
1 cup of sugar
1/2 cup of olive oil


Remember if you use it on your face, be EXTRA gentle.
One bonus about this scrub is that it smells great and might even perk you up. Give it a try.
Monday, February 7, 2011

Sunday, February 6, 2011
Yogurt, My New Obsession
Yesterday was National Frozen Yogurt Day so I thought I would post about my new obsession, yogurt. I know it is not frozen but could be if you want it. I have become addicted to greek yogurt and making my own comes very close. I am using a yogurt maker in this post but I also give you a link for using a slow cooker to make your own yogurt.
 First get out all your ingredients and utensils. This includes the yogurt maker, milk, yogurt or starter, measuring cup, pan, and thermometer (came with yogurt maker). My yogurt maker is by Doniver and I got it on Amazon. I like it but I would recommend one with the glass containers like my mom has, the plastic ones are a little hard to use.
The yogurt maker makes eight 1/2cup containers. So you need to start off with 2 cups of milk which you are going to pour in a pan.
 Next you are going to heat the milk on medium-low heat, stirring occasionally, until bubbles appear (see picture) around the edge of the pan and steam rises.
 Once this happens, remove the pan from the heat source and add the Thermometer. Let the milk cool until it reaches the add starter level. You need the marker to be between the lines.
 Then you are going to add 1 to 2 heaping Tablespoons of the yogurt or you can use a starter mix. Store bought yogurt is easier. Stir until well blended.
 Then pour milk equally into the jars, cover securely with the lids and place jars in yogurt maker. Place cover onto yogurt maker. Plug in the unit.
 Then press the hour set button and the minute if needed to the desired hour. I recommend at least 10 hours, so you need to do this first thing in the morning or late at night. I like my yogurt thicker so I usually do 12 hours. Then press the start button and leave it alone. Time for fun things.
 Once it finishes, you will have thick, creamy yogurt that you made and costs less for all kinds of things. I love mine over top of fruit!
I will tell you there are many ways to make yogurt and you really do not have to have a machine. Here is a link to use your slow cooker to make yogurt, A Year of Slow Cooking: Making Yogurt
Why not give it a try. My next batch I am going to use coconut milk and see what happens.

The yogurt maker makes eight 1/2cup containers. So you need to start off with 2 cups of milk which you are going to pour in a pan.


I will tell you there are many ways to make yogurt and you really do not have to have a machine. Here is a link to use your slow cooker to make yogurt, A Year of Slow Cooking: Making Yogurt
Why not give it a try. My next batch I am going to use coconut milk and see what happens.
Subscribe to:
Posts (Atom)